Journal from Kotnik

PinebookPro

In case you followed my previous posts you already know that ARM architecture should be avoided. It's in early development, things barely work. But, if you are like me: that is exactly what brought you here! So we can continue in the next episode of setting up my #PinebookPro.

But first, #opsec. You really want to fully encrypt your laptop storage, swap included. I think Pine64 is making big mistake by not having an option to do that easily. This post is all about that, if there was an option to secure system then I would happily continue using default Manjaro install.

These are the steps to install Armbian with full-disk (or in this case eMMC) encryption based on very helpful Armbian forum post. Installer does not support this, so you have to do it manually, so let's go.

1) Download Armbian for Pinebook Pro and dd it on microSD. Boot from it using Tow-Boot. I chose Desktop version, but do use CLI option if you want something else than Cinnamon desktop environment.

2) Once in Armbian set up cache directory:

export WORKDIR=/mnt

3) Update your system and install dependencies:

apt update && apt upgrade
apt install cryptsetup-bin gdisk

4) Start installer, when asked choose booting from eMMC and ext4 filesystem (or something else, of course), then exit at the end. Ideally, all this work should be part of installer itself, and eventually it will:

armbian-install || true

5) Now, we want to move installed files and replace the disk with encrypted volume. So, we need to take a copy of data:

mkdir -p ${WORKDIR}/emmcdata
mount /dev/mmcblk2p1 ${WORKDIR}/emmcdata
rsync -a --info=progress2 ${WORKDIR}/emmcdata/. ${WORKDIR}/backup
sync
umount /dev/mmcblk2p1
rmdir ${WORKDIR}/emmcdata

6) Create partition layout. We need two partitions: unencrypted /boot and the rest for encrypted data:

sgdisk -og /dev/mmcblk2
sgdisk -n 1:32768:+512M -t 0:8300 /dev/mmcblk2
sgdisk -n 0:0:0 -t 0:8300 /dev/mmcblk2

7) Create partitions. Simple /boot and encrypted rootfs volume. Notice how we use temporary key for encryption. Don't worry, we'll set up passphrase later. Again, I chose ext4, but you don't have to:

mkfs.ext4 -F -L bootfs /dev/mmcblk2p1
dd if=/dev/zero bs=$((512/8)) count=1 of=/dev/shm/keyfile
cryptsetup luksFormat --batch-mode --cipher=aes-xts-plain64 --key-size=512 --hash=sha512 /dev/mmcblk2p2 /dev/shm/keyfile
cryptsetup open /dev/mmcblk2p2 rootfs --key-file=/dev/shm/keyfile
mkfs.ext4 -L rootfs /dev/mapper/rootfs

8) Mount partitions for sync:

mkdir -p ${WORKDIR}/restore
mount /dev/mapper/rootfs ${WORKDIR}/restore
mkdir -p ${WORKDIR}/restore/boot
mount /dev/mmcblk2p1 ${WORKDIR}/restore/boot

9) Restore installer files from backup at step 5:

rsync -a --info=progress2 ${WORKDIR}/backup/. ${WORKDIR}/restore
sync

10) Tell Armbian not to try to be smart and attempt partition resizing at the first boot, or it will mess up your encrypted volume:

touch ${WORKDIR}/restore/root/.no_rootfs_resize

11) Prepare your new environment:

cd ${WORKDIR}/restore
mount -o rbind /dev dev
mount -t proc proc proc
mount -t sysfs sys sys
cat /etc/resolv.conf > etc/resolv.conf
cat /etc/hosts > etc/hosts
cat /etc/apt/sources.list > etc/apt/sources.list
cat /etc/apt/sources.list.d/armbian.list > etc/apt/sources.list.d/armbian.list

12) Make it aware of proper root filesystem volume:

sed -i '/^bootlogo=/s,=.*,=false,;/^rootdev=/s,=.*,=/dev/mapper/rootfs,' boot/armbianEnv.txt

13) Add active modules to initramfs:

lsmod | cut -d ' ' -f1 | tail -n+2 > etc/initramfs-tools/modules

14) Create crypttab:

echo "rootfs UUID=$(lsblk /dev/mmcblk2p2 --nodeps --noheadings -o UUID) none initramfs,luks" > etc/crypttab

15) Create fstab:

echo "/dev/mapper/rootfs / ext4 defaults,noatime,nodiratime,commit=600,errors=remount-ro 0 1" > etc/fstab
echo "UUID=$(lsblk /dev/mmcblk2p1 --noheadings -o UUID) /boot ext4 defaults,noatime,nodiratime,commit=600,errors=remount-ro 0 2" >> etc/fstab
echo "tmpfs /tmp tmpfs defaults,nosuid 0 0" >> etc/fstab

16) Chroot into your new system and do what installer should be doing in the first place (don't forget, you should be in ${WORKDIR}/restore in case you went to explore around in the meantime):

cat << EOF > config
#!/bin/sh -vx
apt update
echo 'force-confdef' > /root/.dpkg.cfg
apt --yes install cryptsetup-initramfs
rm /root/.dpkg.cfg
lsinitramfs /boot/initrd.img* | grep 'usr.*cryptsetup'
exit
EOF
chmod +x config
chroot . ./config
rm config

17) Set up your final passphrase that will make temporary key obsolete. Use something strong here:

cryptsetup luksChangeKey --key-file=/dev/shm/keyfile --cipher=aes-xts-plain64 --hash=sha512 /dev/mmcblk2p2

18) Umount all filesystems:

umount | awk '/restore/{print $3}' | sort -r | xargs umount 

19) And finally, power-off and remove Armbian installer's microSD card, then start your system. Your data is now protected at rest and you can finally start properly using your Pinebook Pro.


Posts in #PinebookPro series:
This is the second post in my #PinebookPro series. I plan to document all the steps of making it usable.

The first step is installing an operating system. Your Pinebook will arrive with #Manjaro pre-installed on eMMC. It's a fine operating system, but the system is not encrypted and there is no way to do it post-install. Yes, you can do tricks to have encrypted /home directory, but my #opsec requires full disk encryption.

Pinebook does not support booting off an USB drive, and you can't just insert microSD card with operating system and expect it to work. Boot order is hard-coded: SPI chip, then eMMC, and finally microSD.

Side note: I still didn't figure out what does SPI mean, but basically it's a 16MB disk on chip. It's some ARM relic. It arrives empty, and you can flash it with custom bootloader, which is exactly what we will do here.

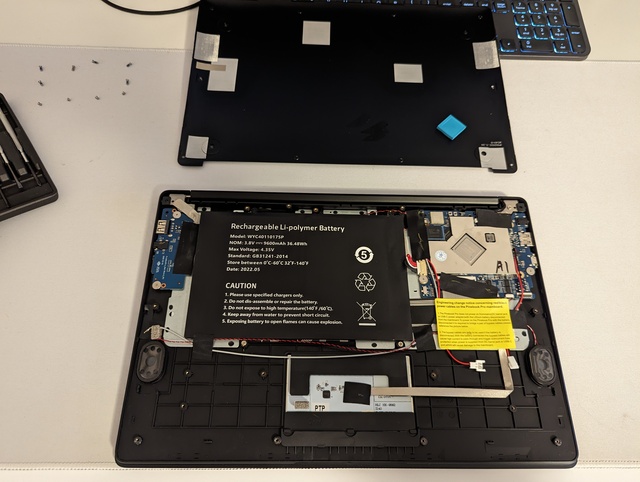
But first, you need to make sure pre-installed Manaro isn't booting up the first. In order to do that you need to open your Pinebook and disable the eMMC chip. It's easy, there's an on/off switch on the motherboard just next to it :) And opening your laptop is also very simple since it is designed to be opened and modified.

Opened Pinebook Pro

The chip is on the top right corner, between ARM SoC (CPU, GPU, etc) and the battery. Next to it is a little on/off switch, and I had to peel off a small protection cover in order to turn it off. So, it's off, put back the bottom cover and prepare the boot loader on microSD card.

There are other options, but I chose Tow-Boot. Get the latest release for Pinebook Pro, extract it, flash spi.installer.img onto microSD card, and boot your laptop with it. Select Flash firmware to SPI on the mini-menu, reboot, remove microSD card and you are done. Now you can switch your eMMC to on, and firmly assemble your laptop.

That's it. Now, when you boot your computer, you will be able to press Escape key and select the boot device. Even USB is supported! This will be essential to the next blog post: installing Armbian. But, more about that the next time.

PS. I really enjoy the hacking involved in making all this possible. Working directly with devices, sending commands and watching the verbose output during laptop initialization. Nowdays Linux on x86 just works, and I didn't know I was missing the excitement of doing things myself.


Posts in #PinebookPro series:

Recently I have been searching to replace my laptop after spending many years with #Thinkpad X1. It's still an okay machine, I will not throw it away, but it has an issue where screen would turn off without any way to turn it off except leaving computer off for a while.

I use this laptop for reading and researching, occasionally for light retro programming. And that's it. So I revised features I need:

  • It should be #ARM based, as this is the architecture I want to experiment with.
  • It must be without active cooling. My phone is without a fan and it can do a lot, so why should I accept noisy fans in my laptop?
  • It shouldn't be expensive.

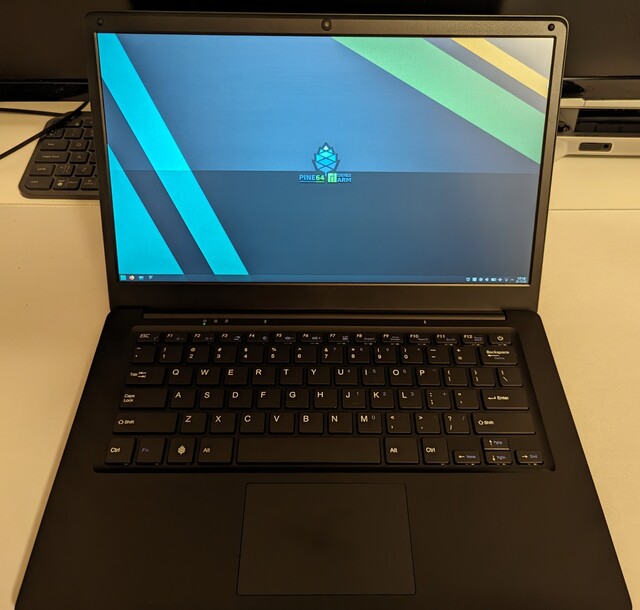
There are not many options out there. There are some Acer Aspire ones. MNT Reform sure looks great, but it's very expensive. Apple Air with their own CPU is also an option, but it is also expensive. And then there's Pinebook Pro from PINE64. Price is around $200, so very affordable, and I am already successfully using their PineBuds Pro headphones. So that's what I chose.

Pinebook Pro

On the order page PINE64 is not joking: they clearly state that this computer is not for casual users and it is built for people who want to work on ARM architecture. And my, aren't they right. But let's see.

First of all, let's quickly go over the main issues with the ARM architecture itself. While being very advanced and powerful, it is completely driven by companies that are not playing with each other, or with open source developers for that matter. X86 architecture, mainly due clones and clone wars, has a reasonable design: there's a bus where devices are discoverable. ARM, on the other hand, are massive chips that integrate a lot of peripherals which talk to each other in proprietary and custom ways. This is best witnessed if you follow up significant but slow work in Asahi Linux; it's mainly reverse engineering with a lot of trial and error type of work. This is a bit simplified view, of course.

At this point, I am writing from the Pinebook. 😊

I want to focus on the good stuff, so let's note what I like so far (I will revise this list as the time goes by, of course):

  • Aluminum case feels so good, in compared to Thinkpad's plastic one.
  • Keyboard is nice, and it feels high quality. Firmware itself is open source, so that is a big plus.
  • I had to open my Pinebook (more about that later) and many parts are replaceable. Most notably the battery. The thing is designed to be opened and it shows.
  • Passive cooling! No fan, no noise, and practically no heat as well.

Now, these are the things I didn't like:

  • Suspending is not working. I got used to this too much under Linux.
  • Keyboard is not backlit.
  • Screen can not be tilted back much, my estimation is 100°. That is not enough.
  • Software support is basic and in development. So far I tried three distributions: Manjaro, postmarkOS and Armbian. You really need to know what you are doing and have to have a lot of experience in order to install and set up your software.
  • There is one known issue with speakers, and this is potential deal-breaker. From time to time it clicks and emits really annoying sound that is somehow related to the level of screen brightness.

All in all, after spending a lot of time to achieve basic things, or at least what has been basic in Linux for more than a decade, I am a bit disappointed. And what I mean by basic is really basic, like installing operating system, achieving working WiFi, encrypted disk, etc.

I will keep and use #PinebookPro, there are a few issues still, but it is usable now. My search for good ARM based laptop is continuing.


Posts in #PinebookPro series: